Sunday, June 2, 2013

Project Preview - Salmonfly Nymph

The salmonfly nymph is an insect within a larger short animation I'm working on, though I'm not sure when I'll be finished with the entire production. It's bigger and more involved (in a good way) than all the other projects I've ever done in the past.

Presented here is a highly abbreviated preview for what will be a thorough exposition via workflow montage, video commentary, and blog posts. While the salmonfly nymph asset is essentially ready for production, the overall project is only about a third of the way complete. I'm posting this because this portion was finalized awhile ago; the salmonfly nymph is fully rigged and ready for referencing into a production scene, so is ready for me to animate. The render below was calculated with Mental Ray 3.10 for Maya 2013, rendered at 4K Ultra HD resolution (3840x2160 pixels) with very little post-processing in Nuke compositing software. Click on the pictures within the post to see them at a higher resolution.

Roughly two hours to render all render layers and passes at 3840x2160 4K Ultra HD resolution.


Modeling
The base mesh was modeled in Maya using polygons, every polygon being a quad. Some components, such as the antennae, are separate objects. 6 mirrored patches comprise the entire UV setup, each being 4096x4096 texels, totaling a bit over 100 megapixels of texture information potential. In the actual animation, with depth of field and motion blur, along with the relative size of this creature on the screen, most of the high frequency details will blend in and go unnoticed. The purpose of creating more detail than necessary is just in case I decide to move the camera in a little closer later on.


Sculpting
Done entirely in Zbrush from the base mesh modeled in Maya. Every single ommatidia (arthropod compound eye lens) was placed using the DragDot tool. Exported 32 bit displacement .EXRs to be applied using Mental Ray approximations, along with being used as aids in the texturing process.


Texturing
First time I used Mari in a more involved way. Mesh imported is 1 subdivision level from base mesh. Over 50 channels and 12 shaders complete the setup to be exported and converted to memory mappable textures for rendering in Mental Ray.


Rigging
Used standard Maya tools without any special scripts. The rig is comprised of constraints, clusters, paint effects, fur, and more of the usual methods used in Maya. Some aspects of the rig I created to be automated, such as proper degrees of freedom on the leg joints, to keep animating the legs simple yet realistic. It's entirely scalable, as I set it up 10 times the real world size it will be in the final animation (approx 5 centimeters) to make the dynamic simulation tasks in this project more predictable.


Rendering
I set up various passes within 5 render layers including one layer for mattes, all by using standard tools within Maya and Mental Ray. Some passes (sssBack and sssFront) are forced through writeToColor buffer nodes. Rendered using batch scripts.


Compositing
The current result is quite simple and the depth of field is purposely weak for quick test exports. The final composite will include film grain, chromatic aberration, motion blur, and other effects. By using World Position and World Normals passes, relighting can be done in 2.5D. Water drops, separated and displaced on their own render layer, will have faked refraction simulated using Incidence and World Normals passes. The graph below in Nuke software is the basic setup I made in order to combine the passes rendered from Mental Ray.


Showing most of the passes rendered from Mental Ray using the built-in Render Passes system in Maya.


As I hinted at above, this is more of a teaser than an educational or potentially helpful post for those who want to learn something new. All that will be revealed later on when the project is complete!

Monday, April 9, 2012

Maya - Gesture-based transforms and fast marking menus

In this post I present two not very obvious, though fundamental and unique, aspects of Maya that will allow you to experience a significant increase in your productivity, especially with polygon modeling.

First, I'll go over gesture-based transforming, which has been in Maya probably since the first release of the software. This is incredibly useful and I use it exclusively for moving and scaling, as opposed to "clicking and dragging" on an axis manipulator. It essentially allows you to move/scale an object in any axis without having to touch the manipulator handle to enable an axis constraint. Unfortunately you can't "gesture-based" constrain rotate axes in the 3D panel view, though it's fine for rotating in screen space or for any previously selected axis. The video below (recorded and played back at real-time speed) demonstrates the efficiency of gesture-based transforming; after that, I'll explain how it's done.


You might be aware that some actions in Maya allow for a middle-mouse button gesture to constrain an operation. For example; you can select some faces on a polygon object, then hold "V" (for point snapping), hold "Shift" (to prepare a gesture-based axis constrain), then middle mouse gesture-based click on a vertex or point and your polygon faces will now line up (so long as you have "retain component spacing"/"keep spacing" in the Move tool marking menu disabled) based on the axis you selected (through the gesture-click, since you never directly clicked the axis manipulator). Gesture-based transforming allows you to move the mouse in the direction you want, and the software recognizes the direction closest to the axis direction (based on screen-space), and then instantly constrains that axis. This means that you don't have to click the axis to select it. The same can be applied for moving and scaling as shown in the video above.

To move and scale an object using gesture-based middle mouse constraining, you hold down "Shift", then press and hold the middle mouse button, and start moving in the direction you want. You can also start moving in the direction you want before you press and hold the middle mouse button. Maya then constrains the axis based on the closest direction you moved the mouse in as you pressed the middle mouse button (based on screen-space), and then you continue moving/scaling in that axis by holding the middle mouse button down and moving the mouse. You can then let go of the middle mouse button and gesture-constrain in another direction by again holding down the middle mouse button while moving in another direction. Unlike the middle mouse button, you don't have to release the "Shift" key during the task of switching manipulator handles via middle mouse button gesturing. Once you let go of the middle mouse button, the last selected axis will still be highlighted yellow, so if you want to select the screen-space handle, all you need to do is re-invoke the move tool by pressing "W"; same goes for Rotate ("E" key) and Scale ("R" key). In Maya 2010 and previous versions, the resetting of the axis manipulator to screen-space via re-invoking the tool doesn't work, so all you have to do is choose another tool (such as Select via the "Q" key) and then go back to the tool you want to move in screen space on (such as Move). This workflow is also useful for little tasks such as when you dolly a camera in but can't see the Move tool's manipulator handle (due to the pivot point being off-screen), so all you have to do is use the middle mouse gesturing technique. It takes a bit of practice to get it down, but it's completely worth adopting this highly-efficient workflow. I'll also add that if your middle mouse button is a bit difficult to press, this might not be very comfortable for you after a few hours; I use the Logitech G700 mouse which has an easy to press middle mouse button.

This method also works in other editors in Maya. For rotating in the UV Texture Editor, there's no need to press and hold the "Shift" key since there's only one possible way to rotate (screen-space). Additionally, to rotate in increments of 15 degrees, hold down the "J" key in the UV editor; the "J" key also works in the modeling panel for rotating incrementally, along with respecting the "discrete-rotate" toggle option in the rotate marking menu ("E+left mouse button") to set either absolute or relative incremental rotations. The video below (recorded and played back at real-time speed) demonstrates UV transformations effectively in move, scale, and rotate tools, using nothing but middle-mouse gesturing.


Now I'll mention the fast usage of marking menus. Maya includes more than a dozen default marking menus and you can create your own using "Window > Settings/Preferences > Marking Menu Editor". Most people know these sorts of things, but what is almost unknown is just how fast you can use marking menus. You're able to quickly gesture through a marking menu before it appears, meaning that once you memorize the locations of menu items (through any level of submenus), you'll be able to extend how much you get done in the same amount of time. You can access any option in the first sub-menu in less than ~0.5 seconds by doing a stroke in one direction and another direction to choose the option (the marking menu will not draw), perhaps add ~0.33 seconds to traverse each additional submenu; essentially one marking menu could have over 50 options each accessible in ~0.5 seconds by an experienced user, the benefit being that it's all bound to one hotkey.

The video below (recorded and played back at real-time speed) shows just how fast marking menus are able to be used once you're experienced, and specifically demonstrates just some of the actions possible with the default selection-type sensitive polygons marking menus ("Shift+right mouse button" and "Ctrl+right mouse button"). You'll see how fast polygon objects are able to be created (with interactive creation disabled), simple operations such as growing/shrinking a selection and pressing "G" to repeat, converting a face to contained edges and beveling, selecting edge rings and modifying normals, conversion from vertices to contained faces for selecting a face in the side view and extruding, creating equidistant edge splits and pressing "G" to repeat, all combined with gesture-based transforming to have a fast experience for modeling in Maya.


It's important to know a few subtle details of going through marking menus at such speeds. For the most optimal results, I've found a certain order of buttons should be pressed. First, you press whatever buttons are necessary to draw the marking menu (such as "Shift+RMB"), then quickly draw your stroke (which might take ~0.5 seconds total for an option in the first sub-menu), but don't let go of the original buttons used to draw the marking menu until the command is "reached" (highlighted) in the marking menu. After some practice it's not an issue at all and eventually you'll do it automatically through memorizing the expectation of when the menu item should be highlighted.

By combining gesture-based transforms and marking menus, you'll be even more efficient. I expect that some people may doubt that the videos shown in this post are "real-time", but they are (I was purposely slightly quicker than usual to show how fast it's possible to use the marking menus) and with experience you can be just as fast. What I've described are not by any means new features in Maya; they're fundamentals, and if you give these tricks a try you'll see the potential, especially once you start creating your own marking menus by using "Window > General Editors > Script Editor" with "Echo All Commands" enabled to take MEL commands and add them to a custom marking menu. For example, I created a marking menu and bound it to "Z+LMB" (using "Ctrl+Z" for Undo) for typical operations such as "Center Pivot", "Toggle Selection Handles", "Toggle Local Rotation Axes", various object and component "Selection Masks", etc.

Using marking menus aren't necessarily faster than using hotkeys, but the benefit is that your hand on the keyboard moves less and you can bind many options per hotkey. You definitely won't be able to fly through marking menus overnight, as it requires muscle memory of where the commands are, but with practice you'll probably agree that it's a great way to work.

Tuesday, March 20, 2012

Maya - Full linear workflow for Viewport 2.0

A gamma of 2.2 is for "practical" purposes, sRGB-encoding, and it's important to be aware of when gamma is being applied so it can be removed for proper 3D lighting calculations, then re-applied when required. If you're confused, here's an excellent page on Understanding Gamma Correction. I won't go into explaining the details of "linear workflow" in Maya, since there's plenty of information elsewhere about it. This post will focus on addressing a problem I was confronted with when using the "Gamma Correction" option in Maya 2012's Viewport 2.0; doubling up of gamma-encoded color textures being displayed. I wanted to have linear sRGB textures in the viewport too, not only in the rendering process. Color Management doesn't work for the viewports, and the gammaCorrect nodes aren't supported in Viewport 2.0 yet (as of Maya 2012), but the problem can be solved by using the Mental Ray image conversion utility imf_copy.

By default, the folder path to imf_copy.exe (C:\Program Files\Autodesk\Maya2012\bin) already exists in the system PATH variable under "System > Advanced system settings" in Windows. It's not important to check, but you'll need to add the path to imf_copy if you encounter a "program not found"-related error. To bring up the command-line interpreter (cmd.exe) with the working folder at the currently focused (active) window: Press Shift, right-click, and then choose "Open command window here".

For scalar textures (such as bump maps, scalar and vector displacement maps, specular amount maps, reflection amount maps, normal maps, etc) along with HDRs (should already be linearly mapped), you could use the following command to convert the image, which produces a memory mappable image file (.map) with the same bit-depth as the input file:

imf_copy -p "input_image" "output_image.map"

However, for color textures (diffuse color and 8-bit reflection color textures), you should use this:

imf_copy -p -e -g 0.4545 "input_image" "output_image.map" map rgba_16

The main difference here is that you're doing a 0.4545 gamma operation on the input image, which approximates the sRGB gamma correction (1/2.2) by bringing the image into a linear representation of color values. This is essentially the same as using a gammaCorrect node with the same setting. So don't use the gammaCorrect node in Maya, and if you're using Color Management (you don't have to), set the file node for the .map image to "Linear sRGB". An important aspect of the newly produced image is that its bit depth will be 16-bit integer per-channel. Converting an 8-bit image with a gamma of 0.4545 will expose posterization (easily seen in the dark colors) when applying the display gamma; by converting to 16-bit, you remove the potential for color banding artifacts. Another option is used: -e (error diffusion), this is enabled to effectively remap the color values to 16-bit using dithering.

Note that you don't have to convert your scalar and HDR images at all, unless you're interested in the memory performance benefits the .map format offers. Also, you don't have to use that format; you could use (for example) Photoshop actions to apply the gamma edits on a set of images and store them to 16-bit output image files. Once you've output the image files, you can import them into file nodes as usual, but however you apply the gamma to the rendered image itself or Render View display (using mia_exposure_photographic, mia_exposure_simple, or Color Management's view manager in the Render View), you'll have a setup that is perceptually correct in Viewport 2.0, so lights will give you a close approximation of how the rendered result will be, at least for relatively simple scenes.

Viewport 2.0 closely matching Mental Ray software render.
To verify my idea, I tested a basic scene using a gradient image in sRGB produced from Photoshop. The Stanford bunny has a real-time reflection map applied (an HDR image) through an envBall node in the "Reflection Color" of the mia_material_x_passes, and the floor is a substance procedural texture converted to a color texture, but has no gamma change applied since procedurals are linearly color mapped already. The photographic lens shader is being used purely for the view gamma, and I reduced the exposure slightly under "Render View > Display > Color Management". If you want the Render View color manager to deal with the view gamma instead of an exposure shader, set the "Image Color Profile" to Linear sRGB, and Gamma on the exposure node to 1.0. Color Management in the Render Settings was disabled, as all images are already in a linear color mapping (or approximated as linear sRGB with the gamma 0.4545 baked into the .map images). There is a bit of noticeable color banding in the gradient image (even with the Viewport 2.0 floating-point render target enabled), but that's fine and doesn't appear in the rendered result.

When working in a real scene, you won't bind yourself to the lighting results the viewport is showing you (unless you're rendering with the Hardware 2.0 renderer), and you would probably want to have tone mapping applied; "Burn Highlights" and "Crush Blacks" at their defaults will alter the rendered image even more from the viewport, but that's a good thing and mimics the human perceptual response better; before doing the final renders ready for compositing purposes, remember to remove all tone mapping and gamma effects; for example, with mia_exposure_photographic, setting Burn Highlights to 1.0, Crush Blacks to 0.0, Vignetting to 0.0, and Gamma to 1.0 will give you a non-tonemapped image; all the other settings in that shader, such as cm2_factor, are simply multiplier effects and won't alter the masterBeauty pass in a non-linear way. In Nuke or other compositing software, you can then re-apply tone mapping effects.

As a concept however, you can see how closely the render matches the viewport, which was the goal of this setup. It's at least useful for properly displaying color maps, and rendering correctly with Hardware 2.0 for pre-visualization work, regardless of how the exposure or lighting eventually diverges from the viewport setup in a software rendering. If you're working in a scene with dozens or even hundreds of textures at 4k resolution, eventually your graphics card won't be able to handle all the textures; that's fine, simply work without textures being displayed.

To simplify all this image converting, you could use a FOR loop in the command line. To avoid having to enter the text editor frequently, use the following batch scripts:
 
Save the text below as "_img-map_scalar.bat" and drag your scalar and HDR images to it:
:convertfile
@IF %1 == "" GOTO end
imf_copy -p %1 "%~d1%~p1%~n1.map"
@SHIFT
@GOTO convertfile
:end
@ECHO.
@ECHO Done!
@pause

Save the text below as "_img-map_color16.bat" and drag color and reflection color images to it:
:convertfile
@IF %1 == "" GOTO end
imf_copy -p -e -g 0.4545 %1 "%~d1%~p1%~n1_linear.map" map rgba_16
@SHIFT
@GOTO convertfile
:end
@ECHO.
@ECHO Done!
@pause

The "color" script is only for applying a 0.4545 gamma correction to 8-bit color and 8-bit reflection maps and converting them to 16-bit (integer) for rendering without banding artifacts. In general, you can use the "scalar" script for everything else; a typical scene might consist of mostly scalar textures and a few HDR color maps, which would be converted using the "scalar" script; note that the "scalar" script outputs a .map with the exact same bit-depth as the input, because no "rgba_*" was specified. If you paint and produce 16-bit color maps from Mari or Photoshop, use the "color" script; however, when exporting a 16-bit color map, if you know you've done a gamma-compensated or full linear workflow while texture painting, use the "scalar" script. The same concepts apply for painting 32-bit color maps; again, be aware of gamma being "baked in" if using typical 8-bit images as painting sources. You're probably painting using 8-bit sRGB gamma-encoded images and the gamma is now "baked" into your 32-bit floating-point color map (if you're basing all your painting in a non-color managed view, which can be changed in Mari under "View > Palettes > Color Manager"). This is fine, but simply be aware of it so you can apply a 0.4545 gamma (with imf_copy) to your 32-bit image exported from Mari. To make a new batch script for 32-bit floating-point color maps that need a 0.4545 gamma correction, just replace the "rgba_16" with "rgba_fp" in the "color" script above, and save it as a new script maybe named "_img-map_color32". Again, it all depends on how you're working, and if a texture image looks a bit washed out or darkened, then you know that somewhere in the image pipeline, you've not compensated for the gamma. Remember, the goal is to have all color data being sent to the renderer to be linear, and you can achieve that using gammaCorrect nodes, Color Management, the imf_copy utility, Photoshop, Nuke, and many other options.

You can name the batch files however you like to, but including an underscore ( _ ) at the beginning of their name will alphabetically sort them to the top of the file browser (with alphabetical sorting enabled). Simply drag the image file(s) over the batch script and it will take each image in the selection and output a .map file to the input's source folder, regardless of where the batch script is located. The Windows command line won't work if you have too many files in your selection (I can't say how many since I think it's based on the path name length of all the files, something like 2048 total characters), so keep that in mind before you drag twenty or so images to the batch script and wonder why it refuses to produce results.

If you're not into dragging the files over the batch scripts and are interested in a more familar menu-based approach, you can append these scripts to the right-click context menu in Windows with the free and highly useful program called "FileMenu Tools" from LopeSoft. Install that program, then in the settings; Add a command, set the action to "Run program", give it a name, set the Element Types for Drives and Folders to "No", then set the path to the batch script. Repeat for both and now you'll be able to right click a selection of image files and convert right from the Windows Explorer context menu. You can set it to spawn multiple instances simultaneously, which would speed up the task significantly since each selected image will be given a CPU thread on its own imf_copy instance, rather than sequentially converting each image on only one thread. Remember that it won't work if you select too many files, as mentioned in the paragraph above.

Using "FileMenu Tools" to use the batch scripts in a familiar menu interface; select images, right click, choose option.


8-bit files converted to 16-bit memory mapped files will be significantly larger than their sources. You could remove the "-p" and " flag to disable filtered image pyramid creation which will reduce the output file size slightly, as it's not entirely necessary (it's useful for efficient texture loading into memory). In future versions of Maya, if the gammaCorrect node is then supported in Viewport 2.0, and/or Color Management works in the viewport (I sent this as a feature request to Autodesk), then you won't have to "bake" the gamma into the .map files. For now, this method works very well.

Update: Maya 2013 has significant improvements in Viewport 2.0, along with support for the gammaCorrect node. If you don't want to use the Color Management feature, you could just use gammaCorrect nodes set to 0.4545 on typical 8-bit sRGB-encoded color file textures and the images will be transformed into linear color space not only for rendering, but for viewport display too (with Gamma Correction enabled in Viewport 2.0), which was the point of this post; getting file textures to look correct in Viewport 2.0. By doing the gamma corrections using gammaCorrect nodes, you'll only need to use one batch script for all your textures (the one that doesn't alter the gamma, the "scalar" one). I'll explore further possibilities as I get into rendering some assets for my current project and I'll post updates if necessary here.

Saturday, March 17, 2012

Windows - Instant allocation of CPU cores to a process

When rendering a Maya scene using a batch script, I always set the number of CPU threads to the maximum the processor can handle simultaneously. I often free up a core or two in order to work on something else, but all without ever stopping the rendering process to edit the source batch script. I'll cover how to do this in Windows NT 6.1 (Windows 7).

Open the Task Manager. (The keyboard shortcut for it is Ctrl+Shift+Esc)
Go to the "Processes" tab. Right click the mayabatch.exe process and choose "Set Affinity"
Now just deselect any cores you want to free up, then choose "OK". Do this at any time you need to dynamically and instantly alter the amount of CPU threading any user process is assigned.

I use this for GUI rendering in a video editing program, command line media transcoding with x264.exe and ffmpeg.exe, GUI and batch rendering in Maya; basically, any time to get some simple control over any multi-threaded task without having to interrupt it.

Sunday, October 23, 2011

Maya - How to manually generate a custom depth pass

There are several methods of generating depth passes in Maya; this tutorial illustrates how to generate one primarily by using utility nodes. This works with both the Maya software and Mental Ray renderer. A true depth buffer test doesn't consider material properties, only geometry along with only sampling each pixel once, but in some cases, you may want material properties (such as transparency) to be respected in your depth pass. Note that this pass will require its own render layer, or if you prefer, a separate file. In addition, you'll learn how to set appropriate render settings, all the way to applying the pass for defining depth-of-field using blurring effects in Nuke or any other image editing software.

Before starting, you should set up the output to some high dynamic range format, such as 32-bit floating point; set up your output file type to HDR or EXR in the Common tab of the Render Settings. Using a 16-bit unsigned integer format, such as SGI16, is okay (it gives 65,536 depth values, derived by 2^16), but floating-point files (even 16-bit half-precision float) give millions of potential grayscale values, which is vastly superior. In Mental Ray, to set up the framebuffer, again in the Render Settings dialog, go to the Quality tab and scroll down to the bottom, to the Framebuffer tab. In that tab, change the Data Type to RGBA (Float) 4x32 Bit; remember that the output file type must be compatible with the framebuffer data type. If you're rendering a depth pass with the default 8-bit framebuffer (and saving out TGAs for example), you'll only have 256 levels of depth in your image; this is no way near enough information for a quality depth pass.

Now feel free to generate a very simple scene composed of some primitive objects, or load up one of your own scenes. Let's create the necessary nodes for the custom depth pass this tutorial is all about: In the Hypershade, within the Create Bar, create a samplerInfo, multiplyDivide, setRange, Ramp, and a Surface Shader. The place2dTexture1 that is automatically generated (by default) for the Ramp node won't make a difference here so it may be deleted. Turn your attention to the Sampler Info node's attributes, shown below.

The Sampler Info utility node is designed to allow the user access to certain rendering data, and use the results in a shading network. Note that this data is only available during the rendering process, and it is generated per-pixel, so whatever effect you're attempting to achieve will not be visible until render time, meaning you won't see any accurate representation of the result in the viewports. Now onto a few interesting attributes: Flipped Normal produces a 0 or 1 (boolean), per pixel, depending on what side of a polygon the camera sees, which is also true for NURBS geometry, since these mathematically defined curves and surfaces are only approximated as triangles in raster-based rendering software. When combined with a Condition Node, the Flipped Normal attribute is able to generate a two-sided material. Facing Ratio is also a highly interesting attribute. Based on the angle at which the camera views a pixel, from 0 to 90 degrees, a floating point number from 0 to 1 is generated. The result, when connected to a Surface Shader's outColor attribute and applied to scene geometry, is an image that may be used for multiple purposes, such as helping to introduce light wrapping, velvet-like effects or even interactively and approximately adjusting the BRDF (Bidirectional Reflectance Distribution Function) of a reflection pass in the compositing stage (achieved by using a matte to isolate the object, and using an exponential operation on the Facing Ratio pass that retains the high and low value, such as gamma). Of course, all these attributes may be used within the rendering process itself to affect shading of surfaces. These are just a few examples of how useful the Sampler Info node is. Now let's take a look at the attribute that will be used in this tutorial: Point Camera. As the name suggests, the attribute returns a pixel's location relative to the camera as a floating point number. We're interested in the Z coordinate, which is the third one of Point Camera, this is effectively the Z depth of each pixel. No values in the Sampler Info node need to be adjusted since all this data is generated at render time.

Simply connect the samplerInfo's pointCameraZ to the multiplyDivide's Input1X using the Connection Editor. This may also be accomplished with a single-line MEL command:

connectAttr samplerInfo1.pz multiplyDivide1.i1x

Also, set the multiplyDivide node's Input2X to -1; the reasoning for the multiplyDivide node being used in this network is due to the fact that the samplerInfo's Point Camera Z is returned as a negative number, and to make this network a bit more intuitive, we're changing it to a positive number by multiplying the Point Camera Z by -1.

Now let's take a look at the Set Range attributes. Set Range simply takes an input value, then maps it directly to a new defined linear range. Value is the incoming floating point connection, Min and Max are the new minimum and maximum values derived from the Old Min and Old Max. For example, an incoming value from 0-1 could be remapped to a new 0-15 easily by using the Set Range utility node. In this tutorial, this node will be used to remap the range of world units given by the Sampler Info node to a range of 0 to 1, so they'll be useful in a ramp which will assign a grayscale color value to each pixel, all in relation to the camera's Z depth. First, connect the multiplyDivide's outputX to the setRange's valueX. Next, let's derive the maximum Z depth distance based on the camera's Far Clip Plane. If you want this to be automated, simply type, in the Old Max X field of the Attribute Editor:

=cameraShape1.farClipPlane

Replace cameraShape1 with whatever camera's shape node you're deriving the value from, such as perspShape. Since this is a single-lined MEL expression, you don't need to include a terminator (;) at the end. The attribute field will turn purple indicating an incoming expression connection, and it will update atuomatically as you change the camera's Far Clip Plane attribute. Of course, feel free to connect the attributes using the Connection Editor, or simply type the value of the Far Clip Plane attribute, located on the camera's shape node, into the Old Max X field. Leave the Old Min at 0. Using the world grid along with the camera's view itself as a guide, decide on the smallest value necessary for the camera's Far Clip Plane. By default, cameras in Maya 2011 are generated with a Far Clip Plane value of 10000, so you might want to bring it within a reasonable range of the scene's depth. So what about the Min and Max values, what will those be set to? Simply set Min X to 0 and Max X to 1. I'll explain what is going on throughout the network once it's set up, so it'll make more sense later on.

Connect the outValueX of the setRange node into the vCoord (located in the uvCoord double attribute) of the Ramp node. By default a Ramp's colors are measured along the V-coordinate, and though the custom depth pass won't rely at all on UV coordinates, it's important the right coordinate connection is made (vCoord for a V-Type Ramp), which will produce the proper result. Remove the middle color swatch of the ramp and set the Selected Color (located at the bottom of the Ramp) to black (RGB of 0,0,0). Now at the top of the ramp, set the Selected Color to a value of 5.000 (RGB of 5,5,5). The ramp will go into a high dynamic range so you won't see a smooth gradient after the ramp reaches 1.0, about 1/5 of the way up, since the Interpolation is set to Linear. Leave it as is, this is exactly what you'll want. The reason 0 to 5 is being used instead of 0 to 1 is because the Zblur node in Nuke has a slider that goes from 0 to 5 and this will map perfectly with that slider. Now simply connect the Ramp's outColor to the Surface Shader's outColor attribute. Apply the shader to geometry objects in your scene. Set the camera's Background Color to white (a value of 1 seems to be fine), and render. You'll probably not see what you would maybe expect; this is because the ramp's value of 5 is pushing the colors out of range. Feel free to change the color value of 5, in the ramp, to a 1, for testing purposes, or keep it at 1 if you're going to be compositing in After Effects and most other programs. However, switching back to 5 for the final render will ease your time in Nuke with the ZBlur node. If you're using the HDR Render View in Maya 2011 and newer versions (enabled by selecting 32-bit floating-point under the Display menu of the Render View window), you'll be able to adjust the exposure and view the out of displayable range values generated by the Ramp node, but it's not necessary.

If you're sure you're doing it right and there's a problem with the render, make sure the camera's scale is 1, 1, 1; this is because the Z value distance scales as the camera scales, and some renderers like Mental Ray take this into account; the Maya software renderer doesn't, however. If your camera must stay at whatever scale it's at (say it might be 8, 8, 8,), then compensate for it in the multiplyDivide node. For example, to compensate for a camera scale of 8, 8, 8, in muliplyDivide1.input2X type: -8. If you don't want to deal with a scaled camera, simply Parent Constrain a new camera to the already animated one; match initial translation and rotation first, then parent constrain (don't parent, as the new camera will just inherit the parent camera's world unit scaling), and use the new camera for this custom depth pass.

The entire network resulting in a custom depth pass.
Okay, let's go over what this network does. As an example, I'll explain what happens to a Z value, at render time, for one pixel. Let's say a particular pixel's pointCameraZ value is -20 at render time; it becomes positive by the multiplyDivide node. Next, 20 enters the setRange's valueX field. oldMaxX is controlled by the camera's far clip plane, and whatever value falls between 0 and oldMaxX has its range set from 0 to 1. In this example, my camera's far clip plane is set to 50, so 20 becomes 0.4. Next, the 0.4 enters into the ramp node, and samples the 0.4 position of the ramp. This ramp goes from 0 to 5 (the ramp color that is), the pixel will pick up a 2.0 value, which was sampled at the 0.4 position on the ramp. In the rendered image, the pixel will appear to be "white" on your monitor, but in actuality, it's twice as bright as white and is not displayable; this extra data is only viewable if you use exposure controls or tone mapping, but seeing it doesn't matter; in Nuke you'll be able to harness this extra data.

The ramp's color entry at 1.0 position is of value 1.0, for ease of viewing.

In the image on the right, you'll see the ramp's color entry at position of 1.0 is set to a 1.0 value. Remember to set it to 5.0 for the final render if you want the best experience in Nuke.

Now, a few statements about anti-aliasing, which is usually needed when a raster-based screen represents a resolution-independent set of data (such as a 3D computer graphics scene). A depth buffer is defined with 1 sample per pixel, which means, no anti-aliasing at all. If you introduce anti-aliasing into a depth map, you'll quickly get edge artifacts in your depth-of-field blur. If you take a moment to think about what happens when pixels are anti-aliased, you'll understand why. To achieve an aliased (1 sample per pixel) rendering in mental ray, open the Render Settings dialog, and in the Quality tab, in Raytrace/Scanline quality, change the Sampling Mode to either "Fixed Sampling" or "Custom Sampling": either one will allow you to set the Min Sample Level and Max Sample Level to 0. If you're setting this up on a Render Layer, be sure to set this new setting as a Render Layer Override. Also, make sure you don't have any lens or environment shaders interfering with your depth pass render layer; use the render layer overrides to disable and then (if necessary) break connections to such shaders and settings on a per render layer basis. Now let's take the rendered image and the custom camera depth render into Nuke.

It doesn't matter how you apply the depth pass; it could be used as a mask in a ZBlur node, but I'll go with the channel workflow Nuke offers. First, select the Read Node of the depth pass image, and then the Read Node for the main image file. Now press K, which will insert a copy node into the tree, connecting the nodes based on your selection order. Nuke offers a depth.Z channel by default, so we won't be creating a new channel; let's copy the rgba.red (any color will do) of the depth pass into the depth.Z of the B input of the copy node.

Depth pass color copied to the start of a very basic composite path.
Now you're ready to use the ZBlur node. Select the Copy1 node and press Tab. Type "ZBlur" and press Enter. Click the image to the left to see the settings of the ZBlur node.

I'll quickly go over this node, in order of its attributes: Set the channels to perform the operation on (all is the default), based on what channel (depth.Z is the default) as a multiplier/mask. There's a few mathematical interpretations you can use if your depth map isn't typical, though the default, depth, will work fine for this setup. Hover your mouse over the math drop-down field for a detailed tool-tip list of what each mode does if you want to try another.


Begin by clicking focal-plane setup. This allows for a simple, easy to understand view of how much blurring will be performed on your image. Adjust the focus plane parameter and watch the line of focus change. Red is near, blue is far, the dark gradient to the mid-line is where focus will be. The depth-of-field parameter is available to adjust and shows up as green, designating total focus area with no out of focus blurring. However, it's recommended to keep depth-of-field at 0 (which is consistent with real camera lenses) unless you have a specific reason to adjust it; I'm doing so here just for this demonstration. When you're finished, toggle off focal-plane setup and watch the viewer redraw the image; complete with blurring beyond the near and far range of focus. You might want to adjust the size and maximum parameters for further control of the blur as well, keeping in mind photographic concepts such as circle of confusion, f/stop, etc; to mimic the way a real camera would work. Hover your mouse over the parameters to see their tool-tips. Filter shape at 0 (the default) gives a Gaussian blur, while at 1, disk blurs the image. Another really important parameter to be aware of is the occlusion toggle. If this is on, further objects won't blur ones closer to the camera, based on the math setting; this is a much more accurate (and of course slower) way of computing the blur, but it's worth it especially if the blur in your image is going to be rather significant.


Multi-pass rendering in Maya has made manual methods (like the one presented here) of achieving a depth pass almost obsolete, but these tricks are good to know if you're in a situation where the more automated tools to render a depth pass don't present you with an opportunity to, for example, respect transparency or certain other properties in materials. In such a case, you might want to use a setup like this and proceed to edit each material of the scene on a new render layer, or set up a script to do it. For example, to respect transparency in the mia_material, disable all lights (or simply don't add them to the render layer) and plug the depth pass shading network's ramp texture into the Additional Color attribute; also set Reflectivity to 0. If all your reflections are raytraced, a simpler option is to disable Raytracing in the renderer instead of bringing Reflectivity to 0 on all materials; in Mental Ray this is done by unchecking Raytracing in the Features tab of the Render Settings window. Below is an example of the custom depth pass respecting material transparency:

Custom depth respecting material transparency. No lights in the render layer; notice the red diffuse color has no effect.
Regardless of how you use it, the workflow presented here will give you more control in the creation of a depth pass for use in adding depth-of-field blurring and other effects in the compositing stage.

Maya - Simple script for viewport performance increase

Here I will share a simple solution I made to a relatively simple problem; disable Maya's "Two-sided lighting" by default when you open Maya and open any scenes during the same session. Disabling this feature increases the default viewport performance by more than 100% (without hardware texturing enabled), and it also allows you to view reversed normals (due to single-sided lighting), easily seen on geometry that has been scaled negatively and had its transformation matrix frozen, as a nice bonus. This script uses a simple scriptJob to accomplish the task. For more details on scriptJobs and the available flags/arguments, view the MEL command reference.

An accompanying video demonstrating the result is located here:
http://www.youtube.com/watch?v=OvVB...ayer_detailpage
It's not necessary to watch however, as all information on how to get this to work is below:


This file you will be editing, initHUDScripts.mel, is stored in the path below, in Windows:
C:\Program Files\Autodesk\<MayaVersion>\scripts\startup\

It's highly preferable for you to copy the file and paste it into your user scripts directory under the (for example, in Windows and Maya 2011 x64) "/UserName/Documents/maya/2011-x64/scripts" settings folder. This way, if you make a mistake, you will be able to revert back to Maya's default script by just deleting your copy of the script. This script will work with previous versions of Maya, and should benefit all Maya users. I highly recommend you try it, especially if you deal with polygon heavy scenes.

I should make note that to get the most out of this script, you should know it operates on the default 4 camera panels. Under the menu Window - Settings/Preferences - Preferences, in the UI Elements tab, you'll see a "Panel Configurations" rollout. Uncheck the options "Save panel layouts with file", and also uncheck "Restore saved layouts from file". This allows the script to disable "Two-sided Lighting" on the default 4 viewports when you open any scene or create new ones; persp, top, front, and side.

Note that some objects in Maya, such as the muscle objects of the muscle system, are polygonal, so you might see mirrored muscles appear flat black, which is slightly inconvenient if you need to edit them; simply enable "Two-sided Lighting" manually for those certain but overall very few circumstances.


Append the lines below to your copy of the "initHUDScripts.mel" script:

// CUSTOM SETTINGS BELOW

// Set Two-sided lighting to off in default 4 views.
modelEditor -e -twoSidedLighting false modelPanel1;
modelEditor -e -twoSidedLighting false modelPanel2;
modelEditor -e -twoSidedLighting false modelPanel3;
modelEditor -e -twoSidedLighting false modelPanel4;

// Run a script job when a scene is opened/created.
string $setupCommands001 = "modelEditor -e -twoSidedLighting false modelPanel1; modelEditor -e -twoSidedLighting false modelPanel2; modelEditor -e -twoSidedLighting false modelPanel3; modelEditor -e -twoSidedLighting false modelPanel4;";

scriptJob -e "NewSceneOpened" $setupCommands001;

// END CUSTOM SETTINGS

Sunday, March 27, 2011

Maya - Flicker-free Final Gather in dynamic animations

"Flickering" is a common issue that comes up for anyone who uses Final Gather in Mental Ray to compute indirect illumination for a scene containing moving objects. This tutorial addresses the flickering problem for animations with dynamic movement; that is, characters, creatures, etc, not just a moving camera. I assume you have some experience with Final Gather, but I will explain some of the most pertinent attributes needed to better understand the workflow presented here. The technique used in this tutorial is applicable to Maya 2008 and newer versions as it relies on the mental images production shader library "mip_render_subset" node. The video below shows the resultant test scene featuring flicker-free Final Gather indirect illumination:


Even in the simple scene above, Final Gather will cause flickering, due to the inherent nature of its random sampling methods. Keep in mind that a frozen Final Gather (referred to as FG henceforth) map works well even on objects that move slightly (such as leaves in the breeze). In the video below, a Paint Effects plant, converted to polygons for rendering in Mental Ray, is flickerless despite its slight motion; this demonstrates that a frozen FG map with very low settings works not just for static objects:


So it's important to know that a frozen FG map is quite flexible, but it has limits, particularly for objects that encounter major lighting changes during an animation such as a character.

Note: Once the mip_fgshooter is implemented into Maya with an intuitive interface, the particular workflow presented in this post won't be necessary anymore, for most situations. For now, there's a few scripts that allow you to try out the mip_fgshooter, such as this one here: fgshooter UI for Maya. There is a discussion of this over at CGTalk forums. Check it out here: Flicker-free Final Gather.

After some experimentation I've settled on a relatively good workflow for achieving a flicker-free FG result; here's the outline listed below.
  • Hide moving objects, compute a Final Gather Map for objects that don't move.
  • Freeze the FG map, then unhide all moving objects, render the scene normally.
  • On a new render layer, set FG as a layer override to "Rebuild", with a new FG map override.
  • The new map will be for moving objects, be of high quality, and will be rebuilt (never frozen).
  • Attach the mip_render_subset node as a lens shader to speed up rendering of second pass.
  • Output the "indirect_result" of the mia_material_x to a surface shader, assign the surface shader to the mia_material's geometry, and associate with mip_render_subset.
  • Render the scene, mip_render_subset will only render selected objects and/or materials; essentially creating a fast indirect pass for moving objects.
  • You'll now have a FG-only pass for your moving objects, to be added onto your original render in the composite.

This method will force you to render the scene twice, but only at the cost of computing an additional FG pass along with ONLY the indirect contribution of the moving objects (characters, vehicles, etc), which shouldn't add much to your render time. The reason the scene requires rendering twice is because FG won't allow setting of Rebuild and Freeze for different individual maps in the same rendering session. Since FG is view-dependent, resolution-dependent, and dependent on how much geometric details and lighting contrast the scene contains, the settings you converge on for one scene will probably not work for other scenes, so the more you know the better you'll be able to get a good result fast. Below are the settings for the above blocks/bricks collision test video for the "Frozen" portion of the FG pass. I'll describe some of the relevant settings, but if you don't know all of the settings in FG and are serious about using it, I recommend you taking some time and make a practice scene, check out the manual, online videos, and experiment with the settings; you'll be glad you did.
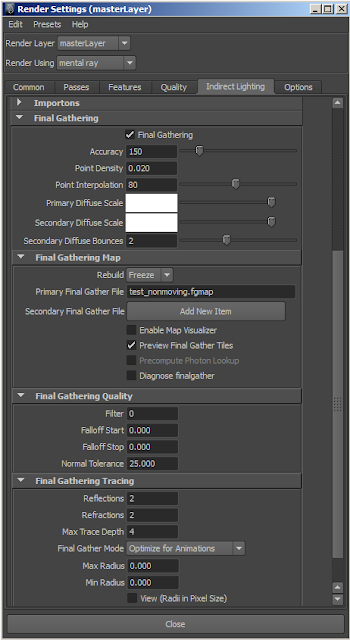
Very low but adequate frozen FG settings for this simple scene.

Something to note with Frozen FG maps: you're able to get away with really low FG settings, particularly the Point Density defining just how many FG points will be sampled from the camera view, while using Point Interpolation to smooth the map out by averaging neighboring FG points, along with the Normal Tolerance which is a threshold that allows interpolation of nearby points to occur only after a certain angle between their respective surface normals is met. As a note on just how resolution dependent FG is, for example, if you set your resolution from 1280x720 to 1920x1080, you're essentially quadrupling the amount of Point Density without even changing the attribute. Accuracy defines the amount of rays casted from each FG point, which increases render time while better estimating the indirect illumination of each FG point. Accuracy is usually worth increasing over Point Density, but it will only go so far, as Point Density is arguably the most important setting. If you're working in a tone-mapped workflow with photometric lights (or the Sun and Sky system), you shouldn't have to change the Diffuse Scales (which are gains on the FG results, allowing surfaces to reflect more or less indirect light than they are supposed to for plausibly accurate light transport in the render). Secondary Diffuse Bounces isn't really relevant here, but if you don't know, it adds more bounces of FG points. By default there is 1 primary indirect bounce of light (there has to be, or else no indirect light would exist), and the secondary bounces are set to 0 by default. Adding a few more indirect bounces will yield a more accurate result with usually little addition to render-time, so long as the FG settings aren't too high. The setting Optimize for Animations (called Multiframe mode in the Mental Ray manual) will usually help on scenes with animation, as the Max Radius parameter is used to limit how far in world units FG interpolation can occur, but it's not always better than the Automatic mode, even for animations. While setting the FG Filter to higher values (such as 2) reduces flicker, it also produces a more biased result (meaning not as accurate). FG is as unbiased as possible with the Filter set to 0, the default, and I recommend you keep it there. On the concept of unbiased indirect lighting, an interesting mode to try out is No FG Caching. This is a brute force method, therefore it's highly accurate but computationally expensive, though it will cause no flickering (only sub-pixel noise). In the brute force method, Accuracy defines how many samples will be taken; the more samples, the less noisy the image, the longer the render time.
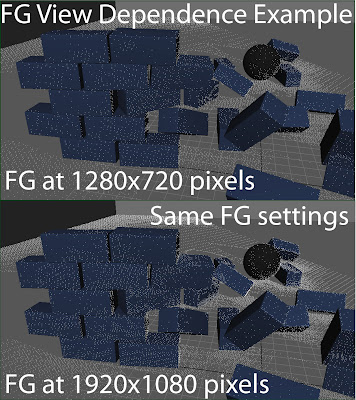

Same Point Density, number of points increase at higher resolution.
Speaking of physically-plausible renderings, when using the Mental Ray Sun and Sky, setting the RGB Unit Conversion of the mia_physicalsky to 0.318 for each RGB component (1/pi or 1/3.1415927) converts the raw values of the Sun and Sky so that they fit easily into the mia_exposure_photographic tone mapper, meaning the Cm2 factor (the Candela per meter squared conversion factor) doesn't have to be adjusted. The Mental Ray architectural design manual describes how 1/pi is derived: "The value 0.318 (1/pi) originates from the illuminance/luminance ratio of a theoretically perfect Lambertian reflector". This is useful to know if you're using mia_exposure_photographic and are trying to replicate a real-world camera setup without having to change the Cm2_factor to some arbitrary number. In addition, each pixel in the final floating-point rendered image will be represented as candela per square meter luminance values.

Alright, so the main idea here is to create a Frozen FG pass ONLY for the objects that aren't moving OR are moving very little (think of leaves moving in a gentle wind). This will entail simply hiding those objects you know are going to flicker with low FG settings, then unhiding them after the FG map has been computed and Rebuild set to Freeze. Always remember to disable the option Enable Default Light in the Common tab of the Render Settings window, as the default light will, among other things, cause a lighting change if you're batch rendering, cancel and then continue the render using batch scripts, so this setting needs to be off. Feel free to use the Render Passes and such; this will be a beauty render without indirect lighting on the moving objects; we'll take care of the FG on those objects next. Just in case you don't know how to create a Frozen FG map, here's a quick explanation, but this isn't the point of the tutorial so I'll make it quick:

To create a Frozen FG map, define a map first in the Final Gather File field (an extension name doesn't matter, though I use .fgmap), then enable the Preview Animation mode in the Preview section of the Options tab of the Render Settings. Preview Animation will render out your scene but won't save files in this case. You'll ONLY be calculating the FG map for your main rendering camera. To set the renderer to render only the FG pass, under the Features tab, set the Render Mode to Final Gathering Only. Image sampling (anti-aliasing and such) settings don't matter and will have no effect, since FG is being rendered only. Then under the Common tab, set the By frame attribute to a setting such as 10, or 5, there usually isn't a need to render every frame for the FG map, unless the camera view is covering a massive change per frame. Keep in mind that the pixel resolution of the image does matter, so you'll need to set that to your target output pixel resolution, also under the Common tab. Now render the current frame and Mental Ray will calculate the FG data for the length of the animation. Remember to switch Rebuild to Freeze and unhide any objects (such as your characters/creatures) you didn't want in the frozen FG solution when you're ready to render again. Here's a quick explanation on the Rebuild modes in Final Gather:

Rebuild On: Overwrites the FG map on every render, and with each frame advance at render-time.
Rebuild Off: Appends (adds) FG points to the map, as needed, without overwriting it.
Rebuild Freeze: Reads from the FG map, doesn't overwrite nor append anything to it.

Alright, now you have a beauty render with frozen FG on all static (along with slightly moving) objects. Those highly moving objects have no FG contribution, so now it's time to render out the scene again, but without doubling the render time, and with minimal effort. If you don't have the mental images production shader library exposed in Maya 2011, in the MEL command line type: 

createNode mip_render_subset

Or, if you'd like to expose these shaders in the Maya 2011 Hypershade without having to manually create them using the createNode command, copy the script mentalrayCustomNodeClass.mel from the directory (in Windows) "C:\Program Files\Autodesk\Maya2011\scripts\others\" and paste it into your local user scripts directory located at "C:\Users\YourUserName\Documents\maya\2011-x64\scripts\", ensuring that if you make a mistake, you can just delete your copy and Maya will work again. Change this line near the bottom of the new file:

int $enableMIPShaders = (`optionVar -query "MIP_SHD_EXPOSE"`== 0);

After the "MIP_SHD_EXPOSE"`==, change the 0 to a 1. (This is a boolean variable, 0 equals "off" and 1 equals "on", so you're now exposing the production shader library to the Hypershade when Maya loads). Also, verify they are loaded by going to "Window > Rendering Editors > mental ray > Shader Manager". Make sure "production.mi" is loaded.

In the picture below, the mip_render_subset node's attributes are shown.


The mip_render_subset node wants you to define at least one object (by typing in the name of a shape node of a geometry object) OR a material's shading group node (not the material, the shading group, because Mental Ray's material is represented as the shading group node in Maya). By the way, if you define a material and a selection of objects, the shader only works if all conditions are met (that is, objects with the particular material (SG node) selected). So what does this node do anyway? Well, it is designed to ONLY render the defined objects AND/OR objects with the chosen material (you can also just define a material and no objects). It's a "quick-fix" shader for re-rendering an object in a scene that was rendered incorrectly (such as wrong material settings that can't be corrected with a matte in compositing), but without having to re-render the entire scene again nor having to isolate the object manually. In this tutorial, we'll use this shader to "isolate" the moving objects in the scene for the second render pass. The shader is applied as a lens shader on the renderable camera under the "mental ray" section. If you already have a lens shader applied (such as mia_exposure_photographic), then simply choose the Create button under the Lens Shaders section of the camera shape node attributes. Note that only the first mip_render_subset node will render, as these are unstackable. Here's a simple demo of using the mip_render_subset for isolating a specific material: mip_render_subset - Basic Example

To enter an object into the mip_render_subset, simply copy/paste its shape node name. Press Load Attributes in the Attribute Editor to refresh/redraw the window, allowing the next empty entry in the object array list to display. Now just add the objects you want to be isolated in the render. To keep things quick, I won't explain the other settings, as they aren't relevant in this tutorial, but, there is one setting that can speed up rendering at the expense of accuracy: Full Screen FG. Full Screen FG is enabled by default, and it does what is reads as: computes the FG pass for the whole scene first, then renders only the objects/materials defined by this lens shader. If you disable the Full Screen FG option, the FG pass will only compute for the isolated objects, so the render time will definitely be faster, but at the expense of accuracy. It is highly recommended you keep this setting on, which is the default. We're not done with the mip_render_subset yet, I've just explained what it is and the general idea of how it's used; you'll soon see how it'll be used along with the indirect_result shader attribute to ONLY render out the FG contribution for the moving objects once I go over some of the FG settings for this second pass, as they are entirely different from the frozen FG map pass.


Before I move on, I'd like to mention that I'm using the Render Layers feature within Maya to assign overrides to various attributes I want to change for the selected layer only, which show up as an orange color. The overall concept is simple but there's a lot you can do; if you haven't utilized them in your workflow yet, I highly recommend you read about Render Layers in the Maya manual. There's also plenty of video and such on the internet describing their use.
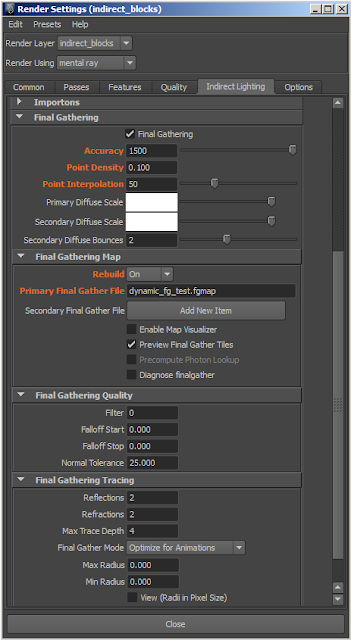

This second pass will require the settings for FG to be considerably higher. For example, each FG point is casting 1500 rays to estimate their indirect illumination. The Point Density is at 0.100 (which is barely enough for this particular scene). Point Interpolation has been set to 50, which eliminates some of the flickering almost for free, but keep in mind that for points to "get the most out of interpolation", you need a certain amount of points that are eligible for interpolation (remember the Normal Tolerance setting). This means that if you don't have enough Point Density in your animation to match the smaller details in the scene, interpolation won't be able to help much, meaning for those areas, Accuracy will have to be high enough to subdue the higher potential for flickering. What I'm saying is that Point Density is the most important setting and will determine if the animation will flicker or not; you need to have a certain amount of FG points or else you can't eliminate the flicker, but it really is a balance between a high enough Point Density along with relatively high Accuracy (for good estimation of each of those important FG points), then use the Interpolation setting for the final smoothing; 25-75 are pretty good for Point Interpolation on typical scenes. Remember that if you change the render resolution, the FG results will look different, so tweak the final settings at your target render resolution. So what settings do you use? There are no specific ones since each scene is different; with experience you'll be able to set up a scene's FG faster. Enable the option Diagnose Finalgather, and you'll be able to see every single FG point sampled from the camera into the scene, while the Map Visualizer will allow you to see the points in the viewport. Consider that some of those points will be interpolated if they're close enough to each other AND if they fit within the Normal Tolerance. Generally you won't have to adjust Normal Tolerance, but there needs to be a sufficient amount of FG points to resolve a good amount of the detail in your scene; along with a relatively high Accuracy setting, which is cheaper than increasing the Point Density and will yield similar results. Remember the Rebuild mode here is On, allowing FG to compute at each frame.

Another very good tip to know about Final Gather is that as you're tweaking it, you're able to get almost instant feedback if you write out a temporary FG map and then set the Rebuild mode to Freeze; you can then adjust some settings in the IPR (Maya's interactive renderer) without having to wait for the FG to calculate again. The settings you're able to tweak with a Frozen FG map: Point Interpolation, Diffuse Scales, Filter, and the Min/Max Radius. Of course, tweaking Accuracy and Point Density require the map to be re-computed. The Min Radius and Max Radius are advanced settings which are best left at their defaults of 0.000, but they can be adjusted if needed. They are good for forcing Point Interpolation to only interpolate points that are near other points to a certain radius in world space; Mental Ray computes internal defaults for the Min and Max radii and you probably won't have to adjust them often, but they're available. Though these FG settings are somewhat "high" (not high at all for a single over-night frame render, but for animations, settings need to be low), they won't fill in details nor color bleeding. That's fine, you can use the mia_material_x's Ambient Occlusion with Color Bleed option, or rendering out a traditional Ambient Occlusion pass for compositing will be fine too. An interesting way to use an AO pass is to color correct the image but set the AO pass as a mask into the color correct, controlling gain and such, but also, adding a bit of saturation back into the darker areas, again using the AO pass as a mask. This method is fine, but if you're rendering in passes (diffuse, reflection, etc), you can apply AO in a more correct way, by rendering out an ambient color or indirect lighting pass, gain down that pass using the ambient occlusion pass as a mask, then add the direct/diffuse lighting on top of the indirect pass, which eliminates the "dirty" look of most renders using ambient occlusion, due to the AO effect occurring in direct light. Now onto setting up the FG pass of the moving objects.

You've already rendered out the moving objects in the first pass; they just have no FG contribution to them; well now you're going to render the second pass, but it will only contain FG for those objects, and you'll be able to composite this new render onto the first one by simply adding color values, with the added bonus of being able to adjust the amount FG contributes to those moving objects if needed. This will be done by utilizing the indirect_result attribute of certain Mental Ray shaders optimized for pass-based rendering, such as mia_material_x and mia_material_x_passes that each expose outputs such as diffuse, opacity, etc.

Side Note: For the sub-surface scattering shader, you should incorporate its scattering result into the mia_material_x_passes' Additional Color attribute, make sure the SSS shader's diffuse and specular contribution to 0, allowing the mia_material to handle diffuse, glossiness (specular), reflectivity, etc, while the SSS shader does what it does best, sub-surface scattering and only that; you could also mix specular/glossiness from both materials. Also remember to assign the misss_fast_lmap_maya node to the mia_material shading group's Light Map Shader slot. If you're to be rendering linear color space HDR (high dynamic range) images, make sure to disable Screen Composite under Algorithm Control of the SSS shader. This keeps the result physically plausible, by keeping the material from reflecting more light than what illuminates it (that is, it obeys the conservation of energy concept). These recommendations for using the SSS shader are from the person who actually wrote it: Zap Andersson (Zap's mental ray tips). I've digressed somewhat, let's get back to the Final Gather stuff, but rendering with color management (aka "linear workflow") is very important.

If you're using the mia_exposure_photographic lens shader and you want to maintain linear color output for HDR images (essential in allowing compositing math to apply in a predictable and proper way), remember to set Burn Highlights to 1, Crush Blacks to 0, and Gamma to 1.0 before you do the final render. In the compositing application, you should use a color Lookup Table (LUT) to transform the image to sRGB (appropriate for all typical LCD monitors) color space for viewing, while allowing the underlying compositing math to operate in a linear fashion.


For the shaders being used in this second pass, in order to isolate and only render the indirect element (instead of everything else too), you'll connect the indirect_result attribute of the mia_material_x (or _passses, whichever you're using) to a new Surface Shader's outColor attribute. The connection is displayed below in the Hypershade. As a side tip, if you didn't know, the green arrow represents a triple-attribute connection such as XYZ, dark blue represents a single connection such as integer to integer, a cyan arrow represents double attributes connected (such as UVs), and purple means a connection to a table of data. The connection we're making here is a simple color to color (3 values of RGB to another 3 values of RGB). Now assign the Surface Shader to the geometry the incoming mia_material was assigned to; if you're using Render Layers, the material will be assigned as a Material Override. Regardless of whether you're using Render Layers, if you render the object now, it will only produce FG or any other indirect result. This is faster and more efficient than re-rendering the object with all of it's shading qualities, those of which were already computed in the first pass.

The next step is to add the moving objects into the mip_render_subset object list. If you have a lot of objects that use the same material, then simply use that material instead of adding the objects manually. Copy/paste geometry object shape node names AND/OR a material's shading group name into their respective fields of the mip_render_subset node. Make sure the node is applied as a lens shader to the renderable camera. Now render the scene and you'll see the FG is computed for the entire scene, but once it finishes, only the objects/materials listed in the mip_render_subset render, AND only their indirect illumination renders, meaning a really fast render compared to computing texture filtering, blurry reflections, and such. If you want a faster rendering without having to disable the Full Screen FG option in the mip_render_subset node, then you might want to disable Final Gather Cast and Final Gather Receive on the distant objects in the scene, ones that wouldn't contribute much if any FG to the objects/materials listed in the mip_render_subset, thus skipping them entirely from the FG computation. This will decrease accuracy of the light transport a bit but will speed up the rebuild of each FG pass on each frame. Below is the result, the indirect result only of the blocks themselves, and they aren't flickering!


That's really all there is to it. Use your compositing application to composite the results onto the original first pass. This may not be the best method to do flickerfree FG in Maya, but there doesn't appear to be much information on the internet about it, and so after some experimentation I found this workflow to be the most efficient and fast, for now. If you have a high dynamic range scene with an intense amount of contrast differences, you'll probably be asking FG to do more than is practically feasible. Another way to smooth out FG is to use a blurred environment map that only FG rays see by means of using a ray switcher; the production shader library includes several such nodes, and keep in mind the usefulness of the mia_envblur node and the Single Sample from Environment attribute in the mia_material. If all else fails, you can always render a Frozen FG map for the static objects and then Light Link a directional Light Rig (without shadows and specular on the lights disabled) onto the moving objects; for best results you can render out the contribution (not talking about Contribution Maps of Render Layers) of the Light Rig lighting the moving objects with all other lights disabled and everything else matted out, then combine that result in the compositing stage to fake indirect illumination; I recommend rendering a test FG image and then try to match that in the compositing program. It won't be perfect but plausible results are achievable that are guaranteed to never flicker. As proof of the Light Rig concept on the moving objects, the video below shows the moving objects lit by a light rig comprising of just around 16 or so directional lights, without shadows, along with the Sun and Sky. This isn't a bad way to go if you're working with an exceptionally complex scene that would require unavailable increases in render time for the significantly more expensive Final Gather computations on extremely detailed moving objects.


Please feel free to leave comments and suggestions!

Maya - Numeric expressions in the Channel Box

This tip is fairly simple, but is quite useful to know; I use this almost on a daily basis for various tasks.

Within the Channel Box, you're able to use simple math expressions, for example by selecting an attribute and multiplying it by 5. This also works on multiple selections of attributes, and in the Attribute Spread Sheet. Let's take a look.

As an example, let's say you want to scale an object up to twice its size, for each X Y and Z component, essentially doing a uniform scale. Aside from manually using a calculator (calc.exe in Windows), you might think of doing "Edit > Freeze Transformations", then selecting all the scale channels and entering "2". However, there's a more proper method, so let's try the math operators instead. Select all the scale channels and enter *=2 as shown below.


Now your object will double in size, uniformly multiplying each selected attribute by 2. From the Maya help file on attribute entry, here's the syntax and available options:


To enter a value relative to the current one:
  • Type +=n to add n to the current value.
  • Type -=n to subtract n from the current value.
  • Type *=n to multiply n by the current value.
  • Type /=n to divide the current value by n.
  • % as a suffix indicates a percentage-based operation (For example, +=10% adds 10% of the current value to each selected value).


Though the Status Line includes an option for "Relative Transform" entry, I find this method to be more flexible, as it allows you to operate on any attributes shown in the Channel Box, Component Editor, and Attribute Spread Sheet. Another example of how useful it is: Halving the intensity of a selection of lights that all have different intensities with *=.5

You'll use this more than you might think.